Let everything you say be good and helpful, so that your words may be encouragement to them. Ephesians 4:29b

Monday, July 30, 2012

Lost in Creative Space: Part II - Green With Envy

Welcome to the second part of my creative space series!  If you missed Part I, be sure to check out how I transformed my office furniture from blah to black!  As I brushed on that black coat of paint, I began to picture what wall color would bring out my furniture best.  I wanted a color that would 1) make my furniture pop, 2) reflect my personal style, and 3) inspire and facilitate creativity, of course!

As I "Googled and Pinterested" through many inspiring creative spaces out there, this photo really caught my attention.


Yes, those Cs certainly grabbed me, but I was surprisingly drawn to those green walls!  I liked her black accents with the green, which helped me visualize my furniture with it.  I traced the room to Creative Keepsakes Magazine's Blog and found its owner to be editor, writer and crafter Cindy Tobey.  Cindy's blog showed more of her "Happy Little Studio" - a super cute and organized space!  She was kind enough to share her two wall colors with me, which ended up being a professional painters brand, so I went and found similar color swatches from Home Depot and Lowe's brands.  The shade I ended up choosing was one slightly between Cindy's two shades.  Meet Behr's Asparagus.


It's hard to share the true paint color here because it can be varied by the camera, the lighting of the room, the digital file and your viewing device.  For instance, if I push the angle my laptop screen back an inch or so, it looks more like the true shade of my walls.  :)  I'd say my color has more of a lime tint to than the above image. 


Prepping to paint this room while protecting my freshly painted furniture was pretty tricky, as you can see.  Everything was stacked in center of the room on top of drop-cloth-covered furniture.  It was a tight fit for painting (especially behind the shelves), but I sucked in and managed get it done.


The above shots show how lighting (ambient vs. indoor) truly impacts the wall color.  My walls are actually a deeper green than the day shots and less lime-y than the night shots, so somewhere between the two.  The final completion photos were taken the next day.  The color photographed light, but the room definitely looks better in green!


Now that you can finally see the full hutch and bookcase with the fabric backing, what do you think?  I am so in love with this simple embellishment.  I think it made a huge difference!  It also helps that I am madly in love with damask. :)  And did you notice the handy item in the corner?   Yup, the CD-rack-turned-ribbon-rack is a great asset to this diaper cake maker!

Sorry for the black-outs.  I wanted to save the small accents for my next post on decor and organization!  I know, I can't wait either, so stay tuned! :)

With green being the topic of the day, I leave you with this verse on being fresh and green in His eyes...

The righteous will flourish like a palm tree, they will grow like a cedar of Lebanon; planted in the house of the Lord, they will flourish in the courts of our God. They will still bear fruit in old age, they will stay fresh and green, proclaiming, "the Lord is upright; He is my rock and there is no wickedness in Him." - Psalm 92:12-15

Keeping Him in mind,


Monday, July 23, 2012

Lost In Creative Space: Part I - Office Furniture Revamp

Howdy and welcome to my first-ever blog series!  I'm very excited to share my creative space project with each of you.  It involved multiple phases, so I thought a series would be the best way to show you the process.  There's no way I could fit it all in one post and I'd also like to keep my readers awake, so here goes nothing!  :)  My first mission? Furniture!

When we moved into our new home, all we had for our new front-of-the-house study was my sad, particle board corner desk.  We knew we needed actual office furniture to facilitate me working from home, hubby's after-hours work, his engineering stuff and all our books.  Since the new office suites were too pricey, we turned to Craigslist.   I loved the idea of a black set.  Plus, it would go with my already-purchased black Ikea Vallvik shelves!  Sadly, there was nothing worthy out there in black. :(  In the end, we settled for a cherry wood-colored  Sauder Hill set from a nearby neighborhood.

Yes, it's engineered wood with a laminate finish, so not a great color or quality, but it was a step up for us and it did the job.


My biggest dislike?  The brass...the gold brass had to go!  It was nice to have "new" furniture, but it was overly traditional and executive office-y for me.  Below is the opposite wall of Ikea shelves. At least they coordinated with the black desktop? :-/


Fast forward one year...

Sharing the office wasn't working out too well and I had pretty much taken it over for work and most things Clearly Candace. ;)  Then my hubby came up with a brilliant idea!  He discovered that one of our attics was actually large enough for a  lab+workspace for him and all his engineering needs!  What?  An unseen, designated place for all those electronics books and beautiful engineering devices?  Um..yes, please!  What?  I can create my very own space in the study?!  Hubby, you rock my world! {squeal!}
On to the first project:  Furniture Revamp!

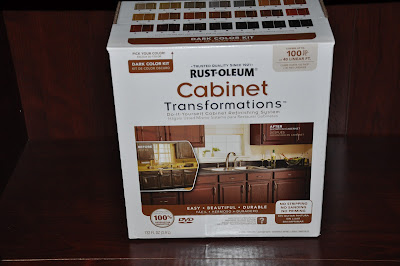
Around that time, a high school friend and blog inspiration of mine, Lindsay of Living with Lindsay, tested a new product called Rustoleum Cabinet Transformations at a convention. It claimed to be the new answer for outdated kitchen cabinets and Lindsay, who updates woods and furniture regularly, was very impressed.  I read up on it and found that it could be used on laminated finish - SOLD.  I had the answer to my furniture problems.  I would create the black office suite I'd always wanted by transforming my cherry laminate finish to a black wood grain finish!  $80 later, I had this:


The Rustoleum steps intrigued me.  It only required deglossing (vs. sanding), a base coat, a top coat and a glaze. I passed on glazing, so I only had 3 steps!  After removing the hardware, doors and drawer fronts, I deglossed the doors/drawers in my garage and the furniture pieces inside the room.  This step required rubber gloves, a scratchy sponge (included) and the deglosser liquid (included). It basically just removed the sheen from the finish.

Prep and Deglossing


The color coats (2) and clear coat were painted using a 2" brush to create a wood grain texture.  Thankfully, I was able to save paint by not painting door backs and inner closed cabinets.  In addition, Pinterest gave me the awesome idea of a fabric-backed bookcase which resulted in even less painting area!  I got fabric (Joann's) and Tacky Spray, removed the backboard, carefully spray-glued the fabric to it-smoothing it flat, trimmed the edges, and reattached the backboard.  Wa-la!  I also purchased a 10-pack of satin nickel finish pulls for the desk and 6 matching oval pulls for the doors (Home Depot). No. More. Brass.  Putting it all back together was my favorite part!


Painting and Fabric Backing
I recently took more shots of the finished pieces, but please accept my apologies for not including the upper shelving.  I wanted to share the color/finish transformation without giving away the rest of the room! :)  I promise to add some full furniture shots to this post after my series is complete. Needless to say, I am still in love with this set and very proud of my this affordable DIY update!


Rustoleum Cabinet Transformation Results


Another bonus about the color choice was that my handy black Ikea shelves now look perfect in the room. :) Oh, and I decided to add another little dandy to the room using the same paint.  A little hint: it's not used for CDs anymore...


I hope you like the outcome as much as I do!  I highly recommend trying Rustoleum Cabinet Transformations if you have similar furniture or cabinets in your home to update.  It's a great product and worth the price in comparison to new furniture or cabinet replacement. 

Stay tuned for Part II of Lost in Creative Space!  Can you say walls? :) Any guesses on color?

Since today was a "transformation" day, I chose to leave you with one of my favorite verses from Romans on life impacting transformation...


"Do not conform any longer to the pattern of this world, but be transformed by the renewing of your mind. Then you will be able to test what Gods will is-his good, pleasing and perfect will."  Romans 12:2


Keeping Him in mind,

Thursday, July 19, 2012

Coming Soon: Lost in Creative Space

Cue Don LaFontaine's voice:

In a world of white walls, cherry veneered MDF, brass hardware and zero organization......one room was in desparate need of a makeover.


Introducing what was formerly known as...

The Baker Study.

(Lucy Says Howdy)

In the coming weeks, you will witness the transformation of one blah office into a space just for me! {squeal!}  I should thank the hubby for creating a man cave from our attic, which allowed me to call this one my own. :)

It was a longer process than I expected, being a busy SAHM with a part-time job, but I did it.  I'm no expert and I had plenty of distractions along the way, but I'm happy with the outcome.  I thought you might like a little sneak peak of glimpses of the fun. :)


Looking forward to sharing this DIY journey with you!  I've decided to call the series:

Lost in Creative Space

I did feel lost at times....mostly lost in the mess-HA! :)

Similar to the outcome of this project, I like this verse and wanted to share:

"The end of a matter is better than its beginning, and patience is better than pride." Ecclesiastes 7:8

A good daily walk reminder.  With that, I hope you'll tune in.
Thanks for visiting!


Keeping Him in mind,


Monday, March 5, 2012

Ninjas, Unicorns and Rainbows..Oh My!

Do I win "Best Random Blog Post Title" with this one?  HA!

My babies are growing up way too fast! Being two years and a week apart, we've been blessed to do a double birthday every year so far.  You might recall their "Veg-Double Bouncy Birthday" last year.  Well, I thought that might be the last duo-party for us.  That all changed when my son showed interest in his sister's gymnastics class in fall.  Next?  "I'd like to reserve one double birthday at your facility, please!"

By the title, you may have an idea of where things went from there.  Yup, two different kids with two different interests, made for two VERY different birthday themes this year.  This was definitely a new challenge for me, but I was absolutely game.  Those who know me can agree that I get carried away with my party visions, but this year, I made sure to stay simple.  The problem:  I liked LOTS of simple things. :) The themes were lots of fun, I will say.  My son decided on a Ninjago-themed party (Lego Ninjas - all the rage) and my daughter's request was "Mommy, I want a party with unicorns and rainbows." Cute, huh? :) Well, I was full-on brainstorming in January.  Pinterest was the source of my ideas or where ideas spurred from, of course. Oh, how I love Pinterest.  I hope you like what I came up with.  It was too fun!

Invitations
Since the gymnastics facility has a few rules and regs and pricey rates, we decided each child could invite 7 friends. Conveniently, my daughter asked girls and my son asked boys, so two different invitations were made.

My daughter's invitations were special.  This is because they were the first project using my awesome Christmas gift - a Silhouette Cameo!!  For the non-crafty, this is a digital paper cutter. :)  I downloaded a unicorn shape from the Silhouette website, got cute white cards, some rainbow ribbon, and a little added cardstock to create this:


For my son, I went the easy route. I found this background graphic online, added some text, printed them as 4x6 photos at Walgreens, and glued them onto some black cardstock.  My son loved them.


Food and Decor
After scanning the Internet and Pinterest for Ninja and Unicorn/Rainbow party theme ideas, I decided on cupcakes for both kids.  Ninja mask faces for his and 3D rainbows with clouds for hers.  These were my party food and decor selections:

Ninja-inspired foods:
- Sushi Rice Krispie Treats
- Swedish Fish
- Shoestring potatoes
- Ninja cheeses, meats and tortillas

Rainbow-themed foods:
- Rainbow Rice Krispie Treats
- Skittles
- Rainbow Goldfish
- Rainbow veggie and fruit plates

Ninjago-inspired decor:
- Balloons on sticks with the above ninja eye masks taped to them (cut by my Silhouette)
- Solid color plates/napkins in each of the ninja colors (red, black, blue and white)
- Ninja eye masks in the 4 ninja colors made from t-shirts
- Black tablecloth decorated with the above ninja mask eyes
- $1 black salsa bowls at Wal-Mart that look like little black woks for candy/snacks
- $6 red cupcake tree from the Valentine's seasonal section

Unicorn/Rainbow decor:
- Balloons on sticks - one in each color of the rainbow
- Unicorn/Rainbow plates, napkins and standing decoration from Oriental Trading Co.
- Unicorn horns - tightly rolled party hats with shiny accents of cut chrome Duck Tape
- White tablecloths accented by rainbow leis
- A vase of rainbow Twizzlers for the kids table
- $2 glass dishes from Wal-Mart (I had 4) for Skittles and rainbow Goldfish
- Clear cupcake tree
- Toy unicorns on cake table (family gifts from her actual birthday)

Here were the results!
Food...


Decor...


Fun! 
The kids had a ball!  They got to do all the standard gymnastics activities (balance beam, rings, bars, trampoline, tumbling) in addition to an inflatable and foam pit.  The boys even got to ride a zip line and fall into the pit!  The coaches were great with the kids, too.  They loved Johnny.


Party Favors
The favors this year were fun and I did them early.  I knew I wanted those little takeout boxes for the Ninjago-inspired favors.  I got to use my Silhouette again for the unicorn/rainbow favor sacks. 

Ninjago-inspired favors: Takeout boxes with Ninjago-inspired eyes containing origami ninja stars using foil cardstock paper, ninja figurines, Pop Rocks and Tootsie Pops.

Here are some free printables of my ninjago-inspired masks via Clearly Candace's Google Drive!  For your personal party use only (no copying, sharing, selling permitted). Enjoy!   


Unicorn/Rainbow favors:  White paper sacks with printed/cut unicorns filled with a wooden unicorn coloring craft, rainbow of hairbands, Skittles and a Unicorn Pop.  I found some online images of the contents, since I forgot to photograph the contents.


Thank You Cards
For the Thank-You's, I found an Etsy shop that created a cute blank Ninjago thank-you card graphic that I printed at Walgreens.  For the girls, I purchased tag-shaped white cards from Hobby Lobby and tied rainbow ribbon to the top. I found a unicorn stamp and added that to the right of my "thanks" stamp using a purple ink stamp pad.  I got standard white envelopes for all the cards.


So, what do you get when you combine ninjas and unicorns? Johnny said he loved the themes as soon as we began decorating.  This pic definitely shows that love. :)


I hope you enjoyed this year's double birthday festivities!  Yea, it was a lot of work for an hour and a half, but 'tis the story of my life.  Maybe I'll tone it down a bit more next year.....maybe. ;)

Thanks for visiting!


Keeping Him in mind,


Wednesday, February 15, 2012

Project: Kid-Capable

**UPDATE**  I just made an awesome upgrade to our kid-accessible beverages!  See below.

My kiddos are four and six in a few weeks.  Recently the hubby and I began the process of letting them take on some of their daily activities on their own.  For example, my son is showering by himself - I remember dreaming of that day a few years ago!  My daughter can now choose, match up and put on a complete outfit, including headband, shoes and socks - Heaven forbid!  Yes, the growing up phase has begun...

I came up with a few changes at home for my kids, giving them a little more independence and responsibility around the house.  I am proud to say that they are doing great with them!  Yes, we've faced few messes, but as with any learning process, we parents have had to practice patience.  I've already said a little prayer for those slightly, obsessively, tidy moms like me that might be encouraged to try some of these.  You'll need to say a few, too. In the end it will all be worth it.  I thought Project: Kid-Capable was an appropriate name for this little "Candoozy." :)

A Kid-Capable Kitchen

Big Kid Cups (You CAN do it and so can they!)
I came to a breaking point with cups and lids.  I was SO READY to get rid of all those parts and no stacking ability (aka: clutter). Lids also come with the mandatory requirement of a parent for filling, capping, uncapping, refilling....yup.  This change was hard for a mom like me who HATES spills, but just remember: They've got to learn sometime! ;)  I think my kids were at the right age to start. My daughter was just three.  We still use cups with lids at school and upstairs for special occasions, but downstairs, in the kitchen only, my kids are using these cups with no problems:


Recognize them?  They're hard plastic party favor cups from the party aisle at your nearby WalMart, Target, H-E-B, Party City, etc.  The kids enjoy choosing them, they are durable in the dishwasher (top rack) and they have large bases to reduce tipping.  We learned that last lesson the hard way with skinny cups.  Ikea's kid cups are also decent, but my son refilled them multiple times per meal.  It might help to start out with a low level of drink until the kids get the hang of not having lids.  I'd also advise reminding them to always put their cup behind their plate.  All our spills are "elbow spills" knocking the cup over due to not putting it behind the plate.

The Kid Cabinet
The main part of our "Kid-Capable Kitchen" was dedicating our kids their own kitchen cabinet for them to access their plastic cups, plates, bowls, snack cups and water bottles.  I used a lower cabinet closest to the refrigerator and under the silverware drawer, so that everything was easily accessible and close together.  I also used a couple of cheap lazy susans (Ikea and Walmart) to make finding/grabbing things easier.


I was quite surprised at how much they love having things at their fingertips to do it themselves!  It's very handy, especially at breakfast and snack time.

Kid-Accessible Beverages
Next topic: Drinks.  How many times a day does your child ask for a drink? Too many.  Smart moms always have a cup on hand everywhere they go.  It never failed that as soon as I sit down for a second or get a phone call, "Mommy, I'm thirsty" would commence. :) 

With the help of our handy-dandy cups and kid cabinet, the kids now have access to getting a drink of water with ease using fridge water and ice dispenser.  Drips and overflows happen, but with time they learned and got the hang of it. If you don't have a water dispenser a stool at the sink might be handy for your kiddos, or......

This?  When I was shopping for some kitchen organization tools, I stumbled upon these babies...

....and the gears started turning!  Check it:


Now my kiddos have access to their own juice and milk!  They LOVE this one!  Plus, no more round gallon containers taking up space - Bonus!  As I rearranged to make room for the dispensers at kid level, I also made their other drinks and snacks accessible. 

Beverage Dispenser Tips:
  • You might let the kids practice using these using water first to gauge overflow/dripping.
  • I use a dry erase marker to write the expiration date on the white lid on top.
  • I always rinse out containers between filling.  At a minimum, I clean the milk container between fills with Dawn and rinse thoroughly with hot water.  I never combine milks of different expiration dates, as I don't want soured milk and bacteria forming in the container. 
  • I also showed my kids how to pull the container out some and lean down when the container is low.  Sometimes squeezing the container pushes air bubbles out and helps flow.  My son can handle the pull-out pour, but my daughter needs assistance.
**UPDATE!**
I have upgraded my kid-accessible beverage dispensing!  Anyone seen these on TV?


Well, the Magic Tap has brought peace to this mom who is tired of cleaning out dispensers and drips inside refrigerator!  So far, I'm loving these advantages:
  • No need for dispensers taking up shelf space!  Just tapped the bottles in the door!
  • Cleaning the taps is WAY easier and faster than cleaning those dispensers!
  • The tap has great, steady pressure (so far), versus the varied up & down liquid pressure of the dispensers.
  • Easy 1-handed dispensing with almost no drips versus the 2-handed dispensing and frequent dripping.
They each require 2 AA batteries.   We'll see how long the batteries last, and since these are brand new, I don't have long-term input...yet!  I'm hoping they hold up well.  If you want to try them with me, you can find them at your local Wal-Mart and Bed Bath & Beyond for $10-$12ea, which is less than ordering them online (+shipping). Happy dispensing! :)

A Kid-Accessible Pantry
If your kids are old enough to access the pantry with your permission, try putting their snacks and food at their level.  My son can make PB&J's, so I also keep the peanut butter and bread accessible to him, as well as the jelly in the fridge.  I also purchased these items for my pantry:

The baskets hold snacks and save shelf space. The item on the right is a sugar/flour dispenser that I got for the kids' cereals.  In addition to the handle and large mouth lid option, I liked that it had another purpose, in case I need it.  With those, here are our kid-capable shelves in our (very tiny) pantry:


Peanut butter - check. Cereal - check. Chips/pretzels - check. Snacks - check. Bread - check.  Cereal was a bonus because now they can pour their cereal AND their milk on top! Mornings run much more smoothly for this slow-moving mom. :)
Pantry Tips: 
  • I cut a tab from the cereal box and taped it it to the container. 
  • I would practice pouring cereal with your child to gauge flow/angle.  My daughter needs her bowl on a lower surface (a chair) to pour, since the counter is too high an angle for her.
  • Throw away boxes and put individual snack packs in baskets to save space. 
  • Three is also a good age to begin showing your child how to open snacks, yogurt, applesauce, juice box straws, etc.  PS: patience is also helpful here. :)

A Kid-Capable Entry/Exit Space

You may have seen my recent laundry room makeover and last year's shoe storage solution, both being kid-capable entry/exit solutions. If not, click on over to Happy Feet and Laundry Room Limbo.  I just added these to make entry and exit time a bit smoother.  Ta-da!


I added a metal wall file found at TJ Maxx with name cards for each of us.  It is now a handy mail/school folder drop upon entry/exit.  I also moved the key rack next to the door and added some simple suction cup hooks to the door for school bags.  This gives more space for coats/purses on the wall and easier to get into the shoe/sock storage bin.


I have no doubt that Project: Kid-Capable will be a continuous one for me.  Those gears never stop turning! :) I pray that some of these solutions and ideas might help you and your family in some way.  It would be a blessing to know that making my family's life easier did the same for yours.

Do even small things like this make you think about your kids' future independence? As sad as it is to see my babies growing up too fast, I do feel that teaching them independence and responsibility is important, and more important than my sacrifice of time and patience.  They become more confident and able.  No, I don't like recalling the Biblical Truth of them leaving me one day.  {Insert fingers in ears and hum}  When I do, I must strive for peace in knowing that God will be with them always.  I also have to remember that it's my job to teach them and prepare them for world.  Besides, what kind of future would they have if they never learned to drink out of a cup, or make a sandwich...or take a shower?  OK, yup - my job's important.  Knuckles to all you fellow moms out there.  We rock.

Keeping Him in mind,

Tuesday, February 7, 2012

Diaper Cake Pick-Me-Up

With the busy schedule last year, I didn't try and promote my diaper cakes, so I had little expectation of making any, unless it were a gift or a shower donation from me.  Well, much to my surprise, I received a few requests resulting in a little green in 2011.  This unpaid SAHM could definitely get used to that. :)

As for pics, my Sweet Cakes Blogspot got deleted. :( I'm sure it was somehow my fault, but it was rarely used, anyway, so Clearly Candace now has a new page!  Notice that the CC menu bar above now has two tabs to choose from.  This page will be a new place dedicated to diaper cake hobby and any other gifts I make for mommies and new babes.  Posts will feed into the CC news feed, as well as on the CC Facebook page, so be sure to "Like" the Clearly Candace page and share with your friends! :)

With that, here are a few 2011 sneak peaks...


You should see a party post in the near future on this last pic.  A new level for the Sweet Cakes portfolio. :)  You can find the rest of my latest cakes via the Sweet Cakes by Candace page!  Thanks for visiting.

Have a blessed day!


Wednesday, January 25, 2012

Laundry Room Limbo

Happy 2012, everyone!  It feels great to be back!  My apologies for leaving Clearly Candace so quiet last year.  Unfortunately family needs and that other j.o.b. were too much to keep up with the blog.  The passion for my environmental career has been gone for a good while now and the position deserved a better employee than this busy mom with her hand in too many things.  So, with many thanks to my gracious hubby who provides for our family with dedication and love, I did not renew my contract for 2012.  I am very thankful for kiddo/family time, service and volunteering time, and a little more time for this! :)  Thank you for your patience and support this past year.  I am anxious to share many new "Candoozies" with you and hopefully add a some new followers along the way!

Now, let's get on to the Laundry!

In a nutshell my laundry room is tiny...teeny tiny.  A 7'x5.5' space.....yeah teeeeny.  It's also the entryway from our garage.  Because of this, we don't have a mud room/entry space for cubbies, lockers, hooks, shelves in those spacious and organized spaces you see on Pinterest.  We simply have a tiny laundry room.  Flashback to April.  We got these energy efficient babies! (Apologies for the sad iPhone 3 pic...)  As for the room, and since I didn't get a "before" pic, I tried to describe it in the photo itself: 

The Itso bins were my way of hiding as much as I could hide with a pop of color since we had shelves instead of cabinets.  The 4 larger Itso cubes in the same colors on the above shelf look like these:


The top shelf had random large items like a cake holder, a party beverage dispenser, booster seats....you know, those big kitchen items that don't have a place in a cabinet.  Don't even get me started on kitchen cabinets...

Well, amongst many frustrating laundry sessions, I happened to run across a laundry room photo like this one back in July.  It's like I got hit in the back of the head with the obvious... DUH-- I can stack my front loaders!  Then the gears began to turn late one night and here was the result.  More space + entry needs =


Yes, I created this in Word with shapes and clip art.  I showed it to the hubby and lo and behold, he didn't think it was a half bad idea! Yes!  Do you notice anything familiar in the drawing? (Hint: See my Happy Feet post!) 

After the vision, life got busy and we didn't get to stacking the machines (which requires a small kit) until November.  My dear hubby cut the two left shelves out with a reciprocating saw first.  After the stacking, I hung a hook rack, condensed items and into the 4 cube Itso cube bins, put our big laundry basket on top of the dryer, and rearranged the top shelf some.  I'm SO excited that my vision actually came true!!  Thanks to the hubby for the cutting and stacking process with help from friendly neighbors with a saw and some man lifting!

So, you may notice that I didn't do everything shown in my drawing.  The dog food/water took precedent over the shoe box.  I also decided the curtain, though concealing, might be a bit cumbersome in this small, busy space.  However, this did lead me adding a clothes rod seen above.  It's actually a spare shower rod.  I now have lots of hanging space for freshly washed/dryed clothes!

It's important to note that since this makeover, a few problems arose:
1.  That handy little rod didn't last too long with too many clothes, so I had to add these:

2. The dog was too scared to eat her food under the coats above her. Wierd.
3. My biggest problem:  Where do I fold my clothes now??!!  This never crossed my mind after the stacking decision.  I also am not a big couch-folding fan.  I like to fold/hang most things fresh out of the dryer to avoid ironing! :) Anything to avoid ironing...

Well, I came up with some solutions and here we are in late January.  I think I may have a functional laundry room!  What do you think?


I hopped on over to Ikea and got a drop-leaf wall table - perfect for folding!  It folds to the wall when not in use.  (I also installed it myself!)  I also grabbed a small divided hamper.  New additions since November include adding the weaved kid shoe bin  and hanging laundry hampers/bags on suction cup hooks.  I am finally ready to conquer the laundry! 

I hope you enjoyed this little organization Candoozy!  Perhaps it will give you some inpsiration for your laundry room. Hopefully you're not like us and you have an efficient entryway and more spacious laundry space!  If not, I feel ya, girl. :)

Thanks for reading!  Until next time.....

With Him in Mind,


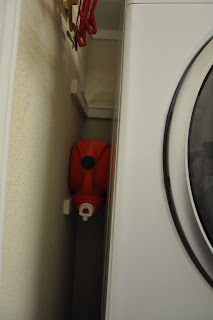
PS:  Was anyone wondering where I keep the detergent?  Nope, not in a bin, but:

Just thought that was a nifty little tidbit to share. ;)