Let everything you say be good and helpful, so that your words may be encouragement to them. Ephesians 4:29b

Saturday, June 29, 2013

A "Boston" Girl After My Own Heart

My 5-year-old daughter has been asking for a "girl bathroom" for a couple of years now.  When we moved into our home almost 5 years ago, we used her bathroom (in her suite bedroom) as the kids' bathroom until big brother was big enough to shower on his own in his bathroom.  Well, that day came and went way back and Mommy had put it off this request long enough!  It was finally time for our first Mommy-Daughter DIY project: E's Bathroom Makeover.

When the idea came around, she originally wanted the typical girl's "pink" bathroom.  She thought of adding butterflies.  The next idea was rainbows, and since the rainbow request included rainbow walls, I had to nip that idea in the bud quickly.  This room was way too tiny for that - and Mommy's not much on extra bold rooms. ;)  As time passed, something else came to mind.

My daughter is a lot like her mommy when it comes to dogs.  She LOVES dogs.  She has more stuffed dogs (and a puppy vet station), than she has babies, cribs and Barbie's.  More than anything, she loves her REAL dog Lucy. :)


I also love this precious dog, and all the other Bostons I have helped love and raise since I was a child in a Boston Terrier-loving family.  My family goes way back with Bostons and I might have been the biggest lover of them all....that is, until E was born. :)  With ideas bouncing around in my mind, I posed this question to her:

"E, what do you think about a Boston Terrier bathroom?"

With a smile ear-to-ear, my girl preceded to jump up and down yelling "YES! YES! YES!  I want a PINK Boston Terrier bathroom!!"  I also grinned ear-to-ear as well, thinking of all the possibilities. It was uber-exciting to take on a DIY project that I was just as excited about as she was! Or more! LOL

Since I didn't take pics of the previous decor, here some from the bathroom in our former home, so you can get why this girl was ready for some PINK! :)


Here are pics of the bathroom before we began painting.  It's tiny...and I knew pink wasn't going to work.


INSPIRATION:
Since bright pink walls seemed a bit much for this tiny room, I told E that if we did a lighter color on the walls, I would get her a pink shower curtain and towels.  Surprisingly, she was good with that!  I already had a color palette in mind that I've been wanting to try somewhere.  It's very fitting for a girl, and since it includes pink, she was good with that too.  Yes!  It was meant to be, I tell ya! :)  My inspiration was a combo of these two pics from Pinterest, adding in the coral to pink, blue and grey. I still smile looking at these two pictures.  These colors are so happy!


E chose the light blue over a light grey. I could've predicted that one. ;)
 We went to Home Depot and chose Behr's Sea Ice. Like?


PAINTING:
Let the painting begin!  E got to do two walls as high as she could reach.  She was quite thorough and did great for her first paint job!  I was a little worried the color was too light when we were painting, but by morning it was the perfect shade of blue!  (These phone shots barely give a blue tint, plus it's wet.... )


The next day...Perfection!!


WALL DECOR:
I really wanted E to create her own Boston Terrier artwork to go on the wall, but I knew she'd need a little help.  I found a few different Boston graphic images online and let her choose one to use.  When she chose her favorite one, I created a stencil of it using my Silhouette.  We went to Michael's and got four 6" sqaure canvases and craft paint in the 4 inspiration colors.  I cut out 4 stencils on adhesive vinyl via Silhouette and stuck them to the canvases.  I covered the edges with painter's tape (my vinyl is 4").  E then painted in each stencil in each inspiration color.


Once dry, she got to peel them off for the reveal of her fabulous artwork!  This was her favorite part.


These make me absolutely giddy!  I also loved that she chose this super adorable graphic out of the ones I chose for her. :)

UPDATE:  These adorable pup stencils are now available for purchase (cheap!) in digital cutting format (.svg) via the ClearlyCandace Shop on Etsy! Tell your Boston-loving friends with Cricuts and Silhouettes! :) 

For the wall opposite the toilet, I initially considered some cute Boston Etsy prints, but then I found a graphic surfing Google images that I tweaked and re-created in Silhouette Studio.  Framing this on cardstock was a much more inexpensive idea than Etsy! As all Boston owners know, this is a true depiction of one of the cutest aspects of the breed. :)
As a final wall touch, I had a cute, white wooden "E" on hand from Hobby Lobby that I thought would look nice next to her wall cabinet.  I added this scrapbook paper with ModPodge for a feminine touch of pink.


SHOWER CURTAIN:
The focal point of this tiny room is obviously the shower curtain.  Finding one was a painstaking process that pushed things back another week.  I wanted one that didn't cost an arm and a leg, in the right shade of pink, with a feminine touch. NOT. EASY.  No local stores had anything but an occasional hot pink, much too bold for the room.  I wanted a more subtle pink and some kind of flare.  I ordered THREE curtains online before finding it.  Sending the other three back wasn't a piece of cake either.  Tip: Read detailed descriptions AND return policies well!  Here were my returns...

Polka-dot Vinyl. Too see-through, cheap quality...

Pink Ruffle.  Too bright and overbearing...

Solid Pink w/Grommets.  Better shade of pink, but boring...

When the 4th curtain came, it was like the angels were singing when I opened it.  ABSOLUTELY PERFECT.  I don't want to show it just yet.  You'll see it in a few scrolls. :) 

Another reason I passed on the grommet one was because I'd decided that she needed fun shower curtain hooks.  I'd seen cute felt Boston gifts and crafts while surfing Etsy that inspired me to make felt Boston heads for the hooks...with E's help, of course!  Unfortunately, I read the Silhouette doesn't cut felt well, so I opted to hand trace and cut.  Cutting parts for 12 boston heads was the 2nd longest phase of the project.  As a Silhouette girl, cutting by hand has definitely become a pet peeve. ;) Some of you may recall this recent Instagram mystery photo (also via Facebook).  I loved seeing all the guesses of what these were! :)


While I had the "fun" job of tracing and cutting parts, E got the better job of gluing googly eyes and noses.  Why does she always get to do the fun stuff?  :(


 I found these simple metal hooks at Ross - cheap!  Once cut, I hot glued the heads to them.


{SQUEAL!}


BONUS ITEMS:
Since we had no accessories for her counter, I had to get creative.  I happened to have a box of Boston collectibles in my attic.  It was fun going through it after years in storage!  The collectibles were the perfect finishing touch to the room.  As shown, there were antique ceramics to cheesy bobble heads! 


THE UNVEILING!

It's FINALLY time to show you the finished product!  
E and I are proud to unveil to you her newly updated Boston Terrier bathroom!


And here are the extra "Boston Pops of Fun," including her new towels!


And how about that shower curtain? 
Nailed it! (as JD on Scrubs would say)

We both totally love it.  We hope you like it and we thank you for allowing us to share our first Mommy-daughter DIY fun with you. :)  My girl is overly-excited about her new bathroom and has been showing it to all her friends.  

We both love how bright and cheery it is when you walk in.  It's funny how a blue room can be brighter than a white one!  The bright pink helps. ;)  And I leave you with a "bright" verse from Proverbs...

"The path of the righteous is like the first gleam of dawn, shining ever brighter till the full light of day"  Proverbs 4:18

Thanks for visiting!

Keeping Him in Mind,


Thursday, May 16, 2013

More Than Apples: Teacher Appreciation Week, Westside Style!

Ok, so when I sign up to be in charge of something, I tend to go a little overboard on it. :)  Are any of you this way?   Well, last year I was asked to be on the PTA Board for Westside Elementary, but due to my youngest still in preschool and just letting go of the part-time job, I regretfully declined to avoid filling my plate to keep my focus on the family and home.  As a result, I volunteered myself for PTA Chair position instead...and I would aim high.  I owed them that much, right? :-/ I chose Teacher Appreciation Chair.  I honestly couldn't think of a better position to serve our school, our teachers and our parents, while also getting to enjoy some of my little "passions" along the way! ;)

August came and I hit school supply sales.  I aimed for supplies teachers need at the end of the year:  pencils, erasers, dry erase markers, glue sticks....and I threw in hand sanitizer.  I sacrificed some closet space for the year, but it was worth it to cushion our TA Week budget come May.  Throughout the year, I over-pinned TONS of ideas for Teacher Appreciation Week on Pinterest.  Come spring, after our birthday madness, my PTA Board VP (shout-out to Bethany Benson!) connected on details.  We came up with ideas for daily gifting for that week.  Students (and parents) also participated in the daily themes.  We created/purchased the rest as the week approached.  With Pinterest, a few fresh ideas, Bethany's 110% contribution and the PTA Board's help, this is how it all came together!


Westside Elementary Teacher Appreciation Week
May 10th - 16th, 2013

MONDAY
"Thank You For Quenching Our Thirst For Knowledge"
Students were sent home a "cup card" (see below) to gift their teachers with.  PTA (aka: Bethany & I) provided teachers a "Drink Day" in the Teachers' Lounge, complete with a flagged cup for each teacher. 

My friend Emily had a great idea to put the card in a straw cup, so I copied her and made a last-minute straw cup/jar with card and treats inside as my son's gift. 
PS: Em's cup was definitely cuter than  mine. :)


The adorable "quenching my thirst" theme/graphic came from A Bushel and a Peck blog.


TUESDAY
"We Couldn't Have PICKED Better Teachers"
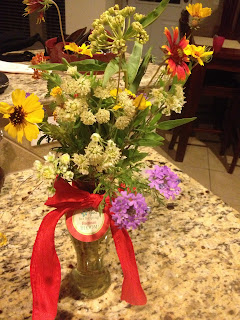
Students "picked" teachers a gift from nature (plants, flowers, fruit, nuts, etc.)  PTA provided teachers a "Fruit Day" in the Teachers' Lounge, with a little thank-you gift for the classroom.  Bethany has a knack at food display!

My son picked wildflowers from our neighborhood preserve for his teacher.


The adorable "Couldn't Have Picked" theme tags come from the Eighteen25 Blog
I tweaked the text a bit for my sign (jpg) and pencil toppers (pdf).
The personalized tag on the flowers comes from the Skip To My Lou Blog.


WEDNESDAY
"Westside Teachers are the Sweetest!"
Students gave teachers their "sweetness" (aka: sweet words, hugs and treats).  PTA provided teachers small storage boxes of candy with the help of  some very helpful Board members! (Thanks, gals!)

I put my son's teacher's favorite sweets (Hot Tamales & chocolate bars) in this little polka-dot bag with one of the extra box tags.


These "sweet teacher" heart printables came from the Tater Tots & Jello Blog.


THURSDAY
"Westside Teachers are Out of This World!"
Students gave  teachers their shining star smiles, "You ROCK's" and high fives.  PTA provided teachers a "Blast-Off Breakfast" of donuts and breakfast casseroles ("thrown together" by Bethany!) in the Teacher's Lounge.

This day wasn't as "gifty," but I decided to send a little something anyway, keeping with the theme.  A quick Silhouette-made stencil, a Sharpie, some burlap, a cute frame and...wa-la! Mrs. R was all smiles. :)


FRIDAY
"Thank You For Your Com-"MITT"-ment to Our Children"
Students made teachers homemade cards of love and thanks.  PTA provided teachers a lunch in the lounge, serving yummy Tex-Mex made by our parents.  Thank-you oven mitts (from Dollar Tree) were stuffed (also by Board members) with the school supplies bought in August!  Teachers loved choosing their mitts among all the colors.
I totally forgot to photograph my son's love card to his teacher!  Oops!

I really enjoyed taking time creating these themes, gifts and decorations, even if it did take a little more time, energy and a few late nights. :) I want to, once again, thank our PTA Board, Bethany Benson and our wonderful parents and students for all their help and participation for our teachers.  Westside Teachers are worth all that effort...and MORE! 
A teacher takes a hand, opens a mind and touches a heart.
"As each has received a gift, use it to serve one another, as good stewards of God's varied grace." 1 Peter 4:10.
Teachers have a God-given gift and they serve our families and community each every single day they get up to teach our children.  God bless you, teachers! 
Keeping Him in mind,


Tuesday, April 30, 2013

Baby "Bogey" Bottoms

So, I just HAD to share my bestie's recent baby sprinkle with you.  Her coworkers decided to throw her a baby boy sprinkle (aka: mini shower for 2nd baby) and since they beat me to it, I offered my help!  The nursery theme is golf, a very easy choice.  Why?  1) Daddy LOVES golf and lived and breathed it (and could've gone pro), and then he met Mommy.  2) Daddy and Mommy met and worked on the golf course!  The beautiful events coordinator and the handsome golf pro fell in love, married on this very day 8 years ago and are now awaiting their 2nd child to arrive! (Happy Anniversary, Leah & Jeff!)  This will be Lil' Bro to precious Big Sister Hannah, 2, who was celebrated just over 2 years ago with "A Little Birdie Told Me.." baby shower, as some of you may recall. :) BBB (Baby Boy Bottoms), not yet named, is due May 18th, but there's no way he'll make it that long.  He looks ready! :)

The little celebration was held at a nearby country club, sister club to Mommy's club. :)  Needless to say, the party decor was theirs for the keeping! I figure they can use it a few more times. ;)


Here are some photo collages I created of the fun and decor...

Leah's coworkers provided food, cake, table signs, wreath and mantle "Baby B(squared)"...and the golf ball and tee idea!  I provided help making the golf tee successful, baby wishes cards, a banner, candy mix favor bags and a diaper cake..of course! ;)


Yeah, this was definitely my favorite part!  So easy being a diaper cake guru!  The sad part is that I had never seen one of these until I was searching Pinterest for golf baby shower ideas! Crazy, right?


Leah got lots of cute boy duds for BBB (Baby Boy Bottoms). Plaid was quite popular, of course!  Miss Hannah was Mommy's Big Helper, too!


It is always a blessing to bless the Bottoms Family!  They are a wonderful, godly family who know and firmly believe that this baby is a perfect gift from their Heavenly Father, and are committed to raise their children to know the love of Christ.  This boy will be beyond blessed!

"Every good and perfect gift is from above, coming down from the Father of the heavenly lights, who does not change..." James 1:17  

Thanks for visiting!
Keeping Him in mind,


Sunday, April 14, 2013

Insta-Coasters!

Does anyone print their photos at Walgreens?  I do!  It's the closest spot to my home get some quick prints when I need something fast.  Well, recently a friend of mine, Mrs. Gentry (who happens to have an awesome blog) retweeted that...


...at WALGREENS!!


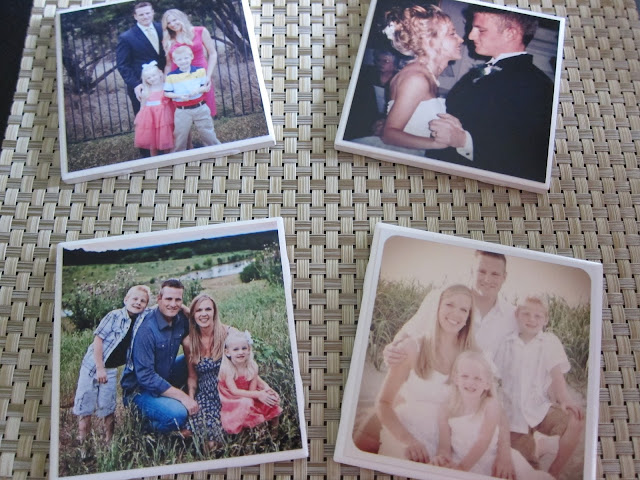
This got me very excited.  I LOVE Instagram photos!!  I so enjoy editing my phone shots with Instagram, making fun, memorable shots, many of which are frame-worthy!  And after making these little goodies for two couples-to-be-wed recently, I was doubly excited! VERY easy...


I was so pleased that I planned to make some for my coffee table with the extra tiles.  That is, until I got the Walgreens news.  My plans got changed.  Did you know Instagram prints are 4x4" in size? :)  I'd like to share my most recent DIY project, step-by-step!  I call them...

Insta-Coasters!

Step 1: Print Your Instagram Photos at Walgreens
Download the Walgreens Mobile App, select and send your best Instagram shots 
to be printed at your nearby Walgreens!  The 4x4's were ~0.40/print.
You will have to create an account if you haven't printed via Walgreens before.

These were my trial shots.  They came out great with a matte (not glossy) finish!


Step 2:  Grab these inexpensive supplies!


White ceramic bathroom tiles (.13ea at Home Depot!
Mod Podge (~$5+ at craft store, depending on size)
Foam brush (.77 at HD)
Adhesive felt pads ($3 for pkg of 75 at HD)
(^ or cut felt + hot glue)

These supplies would cost be no more than ~$9.50 (excluding prints), 
but I keep MP, hot glue, felt and brushes on hand.

Step 3:  Apply felt pads to base of coasters.
I put the pads on first to raise the coasters up for brushing/spraying.
These are white 3/8" pads.  To save a couple of bucks, cut felt and adhere with hot glue.


Step 4:  Use foam brush to apply a thin layer of Mod Podge to the tile.
Make sure to brush to the edges! Rinse & squeeze dry brush when done.


Step 5:  Place photo on tile and use a soft cloth to flatten and smooth out air bubbles.
I used my phone screen protector cleaning cloth. Using your hands will leave fingerprints.


Step 6:  Let Mod Podge'd photo dry 15-20 minutes.
I dried 30 minutes. Don't they already look fun?


Step 7:  Apply layers of Mod Podge to coasters all the way to the edges. 
Allow each layer to dry at least 30 minutes to an hour.
These layers can be more generous than the naked coaster layer.
I did 4 layers because I had the time. :) Rinse/dry brush between layers.


Step 8:  Waterproof with acrylic spray. Follow spray directions on container.
I sprayed mine inside a cardboard box in my garage (or try outside to avoid fumes) and let dry overnight.  A good, open-air dry time helps rid them of fume odor from the spray.


Step 9:  Dry at least 24 hours. 

DONE!

So, what do you think?


I LOVE THEM!!  

I hope you enjoy making your own!  They are also great gift ideas for family and friends.
If you make them, I would love to know they turn out.  I'd also love to know if anyone has any issues with them, and I'll do the same for you!   I only made them a week ago.  So far I only see a slight bubble in one, so be sure that first layer under the photo enough and the photo is pressed down well.  I tried to follow similar DIY coaster methods, but none of them used photographs.  Hopefully they stay durable with the waterproofing spray!

Thanks for stopping by and as always, I'd like to leave you with some encouraging words from Paul on an "attitude of mind" like Christ.

May the God who gives endurance and encouragement give you the same attitude of mind toward each other that Christ Jesus had, so that with one mind and one voice you may glorify the God and father of our Lord Jesus Christ.  Romans 15:5-6

Keeping Him in Mind,